In this episode, Donovan interviews Hank White from Mazak Optonics Corp. They discuss Mazak’s new budget-friendly laser cutting tables, including a powerful tube cutter. Hank also explains how Mazak provides comprehensive training to ensure customers can maximize the potential of their new equipment.
Narrator: Welcome to the Dusty Jobs podcast from Imperial Systems. Industry knowledge to make your job easier and safer.
Donovan: Hello and welcome to another episode of the Dusty Jobs podcast. It’s going to be one of our last ones here we’re doing at Fabtech this year. Every year we get lucky enough to sit down with our partners at Mazak. We help out with their fume collection on some of their stuff.
Hank: Very much, yes.
Donovan: Yeah, this year we got Hank White. How you doing Hank?
Hank: I’m good today, how are you?
Donovan: Good, I’m doing good because we’re getting close to the end of the show.
Hank: Definitely.
Donovan: I’ve been standing all week. It’s nice to sit down for a minute.
Hank: This is probably the first time I’ve sat in three days.
Donovan: Yeah, yeah, yeah, which is great. It’s been a great show. We’ve had a lot of people. You guys have had a lot of people?
Hank: Oh, it’s been a great turnout. Way better than we expected. We weren’t sure because of the storm. Like everyone else I’m sure you’ve talked to, everyone was kind of hesitant, but we had a great customer turnout. Not only that, the customers we had were very strong. A lot of potential buyers, people that are very interested in purchasing.
Donovan: Yeah, that’s nice. Everyone who came is here and is ready to talk about business.
Hank: Exactly.
Donovan: It’s been nice for that. All right, so Hank, what’s your role at Mazak?
Hank: I’m the laser product manager.
Donovan: Laser product manager?
Hank: Correct.
Donovan: Okay, all right. So you’re going to have to tell me what that means.
Hank: So simply put, I help the factory design and build new laser machines, and it’ll be coming out in the future.
Donovan: Okay.
Hank: And I also work with our application staff, our engineering staff, to sell the machines from an engineering standpoint. So we look at what a customer is doing as far as production, what they’re building, what they’re making, and we try to fit them with the correct machine tool for what they’re doing.
Donovan: Sounds like you handle innovation, product placement, and integration.
Hank: Exactly.
Donovan: Kind of like helping people make sure that they get the right thing.
Hank: Even sales.
Donovan: So we help the marketing team with their brochures and PowerPoints for our sales staff so they know how to sell the machines properly.
Hank: Well, I bet they’re glad they have you over there to help out with all that.
Donovan: Sometimes. I do my best.
Hank: So, okay, so with all that knowledge and experience of what you do over there, you have to know about all the new stuff. You’re the guy to talk to about what’s new in Mazak World.
Donovan: Yes, yes.
Hank: So tell me, this year, what’s a big new product you guys have coming out? This year, our new product release was the EZ, basically a low-cost entry-level machine. That comes in low power. It’s 4 and 6 kilowatt.
Donovan: Okay, so this is a cutting table?
Hank: It is. It is.
Donovan: EZ cutting table?
Hank: Yes.
Donovan: Okay, I’m with you.
Hank: The laser has got two pallets on it. Yeah. So it’s built on the same platform as our Neo is, our higher-level machine tool. But it’s a cost-down package. So we’re trying to get the mid-level market for entry-level. As of right now, we have a lot of competition in the low-end market coming from overseas. So if you want to try to recapture some of that, give people an intermediate option to go with.
Donovan: So maybe a smaller shop, they’re out there, they’re thinking, “I can’t afford a Mazak.” That’s where the big boys play. And you’re saying, “No, we want to start helping these people out that are maybe startups, new companies.”
Hank: Exactly.
Donovan: Start getting them into the Mazak mindset early on. Say, “Hey, we can help you guys out.”
Hank: Get them going and get them successful. If they’re successful, we’re successful.
Donovan: Yeah, there you go. So that’s a smaller laser. How thick can you cut on that?
Hank: Even though it’s low in power, we can still cut up to three-quarter of an inch of mild steel, stainless, and aluminum. So it has a lot of potential in those thicknesses. Now, it’s not as fast as the higher-speed machines, but you still have the ability to take those jobs on even in a smaller shop.
Donovan: So when you get a little more economical price, you get a little bit less speed.
Hank: But you’re still getting a big bang for your buck. You can still put it on automation, grow it as you need to, and then add a bigger laser later if you decide to go up in power.
Donovan: So that unit can run lights out? It can run without an operator?
Hank: 100%.
Donovan: Oh, that’s awesome. So does it auto-load and unload like the other units?
Hank: It does. It runs a schedule. The machine has an automatic nozzle changer on it, automatic focus. So really, the key is to make it as easy for the operator as we can, as little maintenance as we can, a little setup as we can.
Donovan: That’s what everybody likes, low maintenance, easy setup. You’re hitting other things that–
Hank: Yeah. You hear from everyone, it’s very difficult to find people right now. Everyone’s hired, or everyone has a job. So finding good candidates that can run the machines, it’s getting less and less. So we need to be able to fill those gaps with machines that are more automated, more simple to use, simple to program.
Donovan: Well, let’s talk about that for a second. So let’s say I’m a guy. I just bought a Mazak unit. Do you guys offer any training on that for someone who’s a first-time laser operator?
Hank: We sure do. We offer free training within the warranty period, which will be two years. We can extend that if needed.
Donovan: Well, that’s a long time.
Hank: Yeah, for sure. For sure. And we do that either at our facility, or we can do it at the customer’s facility. We’ll do it on site, depending on their needs.
Donovan: That’s great. That’s great. So even if I’m the first time buying a laser, you guys got one that I can afford, you got some training for me, maybe for my employees who are going to be running it.
Hank: Yeah, exactly.
Donovan: That’s great.
Hank: And full application support. So once you get the machine, you’ve been running it for a while, you may run into applications or materials that you’re having a difficult time with. Maybe you’ve never ran them before. We have a dedicated application staff that will assist in that cutting process. You can send us material to our showroom in Elgin, Illinois, and we will process it for you, come up with cutting condition data, or we can actually set up an application’s visit where one of our engineers will come out on site, work with the customer to improve their production, get more efficiency, better quality out of the machine.
Donovan: Man, that is some great support. I mean, that’s what a lot of people need. It might be scared about taking a job on because it’s something you’ve never worked with before. You guys are there, you got their back.
Hank: Yeah, we’re not just a machine tool provider. We try to bring people in like they’re family. Again, like I said earlier, if we can make them successful, it only makes us more successful in the future.
Donovan: That’s great. That’s great. Now, before this, we were also talking about that you guys came out with a new beam cutter. Is that right?
Hank: A new tube cutter.
Donovan: Tube cutter. There you go. Sorry, I got it wrong.
Hank: So, the tube cutters are basically the same machine. What’s new is going to be the control interface on the machine tool.
Donovan: So what’s the name of that machine?
Hank: It’s going to be the Smooth Tube.
Donovan: The Smooth Tube. I like it.
Hank: So it’s a very simplistic user interface. It’s all touchscreen. There are no hard keys anymore. And what’s nice about it is we’ve set it up in a smooth process. That’s why we call it our smooth system.
Donovan: Makes sense.
Hank: Every step from bringing a program file in to setting up the machine to bringing up a schedule or creating a schedule, all the way through what you need to do to run that machine is step-by-step instructions. So you can take a very green operator and get them to run that machine in as little as a week and be very efficient at running it.
Donovan: So it sounds like what you guys have done is make it maybe a more of an intuitive way of running this piece of equipment.
Hank: Exactly. Yes, a good way to say it. Exactly.
Donovan: So, okay, so if I’m a new guy, I have never ran one of these machines before. How long do you think it would take to train me on it?
Hank: I would say probably a solid month. And that’s not necessarily because you can’t run the machine, but a lot of questions are going to come up and you’re going to need to get comfortable with it. Typically, we set up a several-week training course where we come out to you. We can do it in-house, but a lot of the times we don’t have that machine, particularly in our facility because of the size that they are. They’re very large machines. Right. But we’ll come out and we’ll spend several weeks with the customer and go through basic setup, maintenance, and then slowly work into building schedules and how to process tube on the machine. And then we go from there to actually addressing real issues if you crash. We set up different shocks, how to do more periodic long-term maintenance on the machine tool.
Donovan: Yeah.
Hank: And there’s always going to be things that will come up over that period. So, what we do is on the last week or so, we kind of just hang back and we watch the customer run the machine. They run production on their own, and if they have a question, they come tap us on the shoulder, “Hey, how do I get around this issue?” So, by the time we leave, they should be self-sufficient in running the machine tool.
Donovan: So, if I have a Mazak table and I’m looking at getting the Smooth Tube, now, are those controls similar or are they going to be different?
Hank: Yes. They’ll be almost identical in functionality. Some of the screens, obviously, will be different because the five axis had, the process had, the delivery system for the material. One’s going to have a flat sheet. The other is going to have a tube or pipe depending on the shape. So, very different machine tools, but a very standardized control. So, if you’re on one machine, you’ll have an easy time going to the other machine and understanding the workflow and how the machine processes.
Donovan: Oh, that’s great. That’s great. So, if you already have one, you get this other machine?
Hank: Exactly.
Donovan: You’re going to have a learning curve. You’re going to be way ahead on that learning curve.
Hank: Yeah, short learning curves, like we like to say.
Donovan: Yeah. Yeah. Yeah. So, that’s great. Well, you know, we work with you guys to try to make sure that all that fume that these machines produce gets collected, and we’re just glad that you guys work with us on that because, you know, you guys have safety in mind. We have safety in mind, and both of our products not only do a quality job, but, man, I mean, I’ve been around yours, and you guys have a lot of safety protocols in place to make sure that that operator stays safe.
Hank: Yes, 100 percent. And we can trust you guys to give us that satisfaction. You’re running in the background and creating a clean environment. I don’t have to worry about my customer running into those issues because I know you’ve got our backs.
Donovan: Yeah.
Hank: You’ve been an absolutely amazing partner through all of this.
Donovan: Oh, we appreciate that. Yes. Thanks. Thanks. So, what can we be — do you got anything behind the curtain? Anything that we could be seeing from Mazak down the line here that you’d want to share with us, or are you guys just going to keep dialing in what you got?
Hank: Let’s just say next Fabtech a year from now, come see us. We’re going to have some pretty exciting things on the docket.
Donovan: Nice.
Hank: So, I can’t talk about it too much right now.
Donovan: No, that’s good stuff.
Hank: I wish I could. You know, you’ve got those things you want to work on and get out into the public.
Donovan: I know. I know. Well, the reason I brought it up is because I know you guys are always changing, innovating, and making things better for your customers.
Hank: That’s all you have to. You have to keep up with the market. And technology is moving so fast nowadays. You have to constantly be innovating. And we’re thinking, again, five, six years ahead. So, we have projects. It’s hard, too, because we don’t know exactly where the market will go. You know, we have a corridor that we’re in, and a lot of us are kind of taking a lucky guess and trying to hit a moving target. So, we do the best we can to innovate. And we look at our competition. We look at the industry. Everything that’s going on economy-wise. And we kind of use that to direct us to where we’re going.
Donovan: Yeah. And hopefully our economy keeps doing well, keeps growing, and we’d love to see more stuff being made in America.
Hank: One hundred percent. Bring it back home.
Donovan: Bring it here. Yeah. So that we can have more American jobs. So, you guys have a lot of middle-class American workers working for you guys. So do we. And it’s great to just see more of those guys getting jobs, guys and gals getting jobs.
Hank: We’re living the American dream. I can tell you right now.
Donovan: So, anyways, thanks so much for coming on.
Hank: No problem. I’m glad you had me.
Donovan: We’re glad that we get to work with you guys and just, you know, making a clean, safe environment for everybody in your shop and in ours.
Hank: Yep. And we’re glad to have you.
Donovan: Well, hey, thanks for listening. Thanks for tuning in. If you want more information about Mazak, you can go on their website. You can get more of their information. It’s all YouTube.
Hank: YouTube. Just check. Just Instagram. Instagram.
Donovan: Yeah, whatever you want. Yeah. And you can check us out on our social media. Facebook, LinkedIn, YouTube. And so, but thanks for listening. And until next time, just stay healthy and stay safe.
Hank: Thank you.
Narrator: Thanks for listening to the Dusty Jobs podcast. Breathe better. Work safer.
Crazy story – we met Derek Shaffer in Orlando at Fabtech 2024 when he happened into our booth. He was there as a speaker to talk about his Phd research project from Penn State on additive manufacturing. Little did we know that he grew up just down the road from Imperial Systems. He now works at Ellwood National Forge, just north of us in Corry, PA. Donovan talks with him about his research and the future of manufacturing. Derek also talks about what Ellwood National Forge makes and who they make it for.
Narrator: Welcome to the Dusty Jobs podcast from Imperial Systems. Industry knowledge to make your job easier and safer.
Donovan: Hello, welcome to another episode of the Dusty Jobs podcast. We get to meet all types of people here at Fabtech, which is awesome and great. And we’re sitting here with Derek Shaffer, who’s a metallurgist, did I get it right?
Derek: Yes, you did.
Donovan: From the Elwood National Forge. And we’re just honored to have you. You were a speaker this year at the Fabtech, right?
Derek: Yeah, yeah, so I was actually an invited speaker at the AWS Professional Program associated with Fabtech. They bring in a lot of the welding and manufacturing stuff. I had won an international award for some of my graduate work that I had been doing at Penn State.
Donovan: That’s awesome.
Derek: They invited me to come and give a talk on that paper as well. So I’m glad to be here, glad to talk to you guys and get a little exposure for that and for the AM field and while we’re doing it, Ellwood also.
Donovan: Yeah, and that’s great ’cause we’re a Western Pennsylvania company. You guys are a Western Pennsylvania company. So it was just great to see you at our booth here and talk a little more about that. So one of the things we, when we’re at Fabtech, I mean, I’m sitting in this booth all day long. But what’s great is that they have speakers like you and you got to go actually probably sit in on a couple of other people talking too.
Derek: Oh yeah, oh yeah.
Donovan: So can you tell me, ’cause I’m just getting to sit here all the time, what are a couple other topics that people could learn about when they come to Fabtech?
Derek: Oh, you can learn about lots of things. So most of the talks I sat in were part of the AWS Professional Program because I’m a welding and additive guy. But anything from, just in the additive world, you’re talking wire feedstocks, powder feedstocks, arc processes, laser processes, electron beam processes. One of the interesting themes that I saw in a couple presentations this year were welding in microgravity.
Donovan: In microgravity?
Derek: Yeah, so that way you can theoretically weld on the moon if you’re trying to assemble colonies or whatever up there, manufacturing facilities, you can send up a welder and you know what’s gonna happen.
Donovan: My guidance counselor in high school never told me that there might be welding in microgravity. I didn’t even know, so that’s gotta be some new stuff that’s like…
Derek: Yeah, it’s interesting ’cause you see kind of a trend where there’s some stuff where people were thinking about this stuff when we were first going to the moon. And then it kind of went away and now it’s starting to come back. More and more commercial space travel, the likelihood that we’re gonna start setting up manufacturing colonies, more investigation on things like the moon or Mars keeps going up and up. So the technology has to go up and up.
Donovan: So that’s awesome to me to learn more about that because it’s not just about somebody fixing a muffler anymore. There’s so much you can do if you get into welding and learn about it. Now, you, tell me more about this paper. What was your paper on? What did you get to talk on at this conference?
Derek: It’s been funny since I won the award for the paper based on a chapter of my dissertation. I tell my family and part of that was going to the International Institute of Welding Annual Assembly, which is in Greece every year. So I’m telling my family, I’m like, this is cool. And they’re like, yeah, we don’t know what you’re talking about. It’s a range of people who are like, this is a big deal. And you know, you talk to the AWS people and they’re like, this is a big deal. And then you talk to, and I talked to somebody else here today who was in welding and they’re like, yeah, I don’t know what you’re talking about.
Donovan: (laughing)
Derek: So the award is called the Henry Granjon Award. It’s a paper based award. So a bunch of people submit papers and they pick the best one. I was talking to Dr. Patricio Mendez from the University of Alberta. He’s big in the community. And any AWS person would know who you’re talking about. But he was like, oh yeah. The big thing to remember is the fact that you won that award means that some Chinese guy didn’t win that award.
Donovan: Oh.
Derek: And I was like, that’s America. Go Team USA.
Donovan: Yes.
Derek: But IW is an interesting organization because they’re all about bringing people in and disseminating information across borders and trying to bolster the technology as a whole, not just hey, US DOD is pretty advanced, but France can’t do that. So trying to level that playing field, I guess, so to speak.
Donovan: All boats rise with the tide.
Derek: All boats rise with the tide. So this paper in particular, like I said, based on a chapter in my thesis, is about the aging response of additively manufactured precipitation hardened stainless steel.
Donovan: Okay. You said a lot. And I’m gonna have to, we’re gonna have to break that down a little bit piece by piece, okay?
Derek: No problem.
Donovan: Additive manufacturing.
Derek: Yeah.
Donovan: Okay, so what’s that?
Derek: So additive manufacturing is probably the broad strokes part of this. And it encompasses a lot of things, right? So you have additive manufacturing on a tiny scale where you’re taking 10 micron sized powder particles that you spread out in a nice even bed and then you hit it with a laser and melt those particles together. And then you turn over and over and over in a layer into a shape.
Donovan: Gotcha. So it’s kind of like 3D printing.
Derek: So 3D printing is usually used as a term for like polymers, but also people call it printing when it’s melt. Like they’re pretty much interchangeable. But usually the first thing you think of when you think of 3D printer is the nice little filament plastic thing.
Donovan: Yes.
Derek: So metal people like to use the word additive manufacturing because now we can differentiate the two.
Donovan: Well, yeah, yeah.
Derek: Even though they’re not that different. So you have additive manufacturing on that scale, which was what my project used mostly, but there’s other types of additive manufacturing. You can still use a laser and powder, but now you could do things like spray the powder through nozzles at a melt hole that you make with the laser. And that goes a lot faster, but your dimensional tolerances go down. So each process has its give and take. It’s just like the difference between mig and tig welding, if you’re familiar with traditional welding, you know, it’s the difference between using a little ball peen hammer and a sludge hammer.
Donovan: Right.
Derek: Depends on the job.
Donovan: Right.
Derek: So, you know, now I work for Elwood. We deal with large custom forgings. We’re trying to make big stuff. Kind of our philosophy is bigger, better. And we need people to do that. And we need people to do that. You know, the Navy never won battles with centimeter scale battleships. So now that I’m getting into that length scale of things, it’s been interesting kind of taking what I’ve learned at these little lab scales on these little machines, looking at some of these processes that can lay down a lot more material and additive, but then also looking at the traditional and learning more of the traditional manufacturing through forging and casting.
Donovan: All right, so, okay. You’re gonna have to say it again. Your talk was on additive manufacturing, but what was the next part?
Derek: Yeah, so the next part is aging of precipitation hardened stainless steel. So aging is just a heat treatment that you do to give certain steel strength.
Donovan: Oh, okay.
Derek: The steel, the chemistry of the steel has to be designed such that something happens when you heat treat it that way. And then the precipitation hardened part essentially is the chemistry. So in these particular alloys, there’s copper in the steel. Copper doesn’t like to be in steel. So what happens is when you heat it up a little bit, the copper starts to come out as like little bubbles. It’s like when you put too much salt in your water and the salt starts to fall back out of solution. The copper starts to fall back out of solution in the steel.
Donovan: So it’s trying to get rid of it.
Derek: Yeah.
Donovan: And your process is trying to keep it in.
Derek: No.
Donovan: No, okay.
Derek: So the copper coming out is what actually gives the strength to the steel.
Donovan: Okay.
Derek: So what’s happening in additive manufacturing is we’re taking these alloys that were originally designed to be cast and rolled and forged. And we’re saying let’s atomize them and make them these little tiny powder particles and then hit them with a laser and expect the same exact response. You could tell anybody that and they would think that that’s crazy. Because it’s this big versus this big and totally different melt sizes and the whole thing. But that’s the expectation. And kind of one of our group’s themes at Penn State, I was in Dr. Palmer’s research group, one of our big themes has been, you know, we’re gonna have to start playing with these compositions. We’re gonna have to start adjusting these grades, coming up with new grades, specifically for additive. Because the translation’s just not there. So to take that back to what I was working on, what we’re seeing a lot in 17.4 in precipitation hardened stainless seals is a significant amount of nitrogen pickup and oxygen pickup in differences in manganese content and all these things. They’re influencing what phases we get. So you can think of like a 316 stainless steel. Versus like a high carbon steel. React very differently. And you’re getting that difference in what should be the same grade. So what we essentially tried to do is say, okay, well, if you end up with this behavior that you’re not supposed to get, can you bring it back to something that you want to get? So that’s, I was looking at the aging response of these different compositions and trying to essentially say, okay, well, if you have this type of composition, you’re gonna heat treat it this way. If you have this type of composition, you’re gonna heat treat it the other way.
Donovan: So you’re kinda coming up with a recipe on how to get the result of a hardening that you wanted in the steel.
Derek: Yes, exactly.
Donovan: Gotcha.
Derek: Yep. We like our recipes between the composition recipe and the heat treat recipe and the, it’s just a big cookbook over in the metallurgy world.
Donovan: You get all those dials tuned in right and you get a really good piece of steel.
Derek: Yep.
Donovan: So, okay, so you’re, – but the process you were looking at is, instead of the traditional way of doing it, you were using lasers to do it.
Derek: So that manufacturing is where the lasers come in.
Donovan: Yeah.
Derek: And that’s part of where you get that chemistry difference between the powder atomization process and then also consolidating those powders in the parts. You’ll pick up some of the cover gas, and a lot of times it’s nitrogen ’cause it’s cheap. And that nitrogen pickup and a lot of the oxygen pickup from the small powder particles, that’s what’s causing a lot of the changes in the heat treatment response.
Donovan: Right. And so you’re, you kinda helped develop the correct recipe for doing this, right?
Derek: Yep, yep. Basically we evaluated a bunch of different heats of material and we looked at a bunch of different heat treatments and we were able to figure out, okay, well, if we do this little preceding heat treatment and we up the temperature to this, how much does it change? And we’re actually kind of able to translate those pretty well.
Donovan: Okay, so what does that, for me not being in the field, not knowing 100%, what is the advantage to doing that with the laser as opposed to doing it the old way that you should do?
Derek: Yeah, yeah, yeah. So additive manufacturing in general. So the big advantage to additive manufacturing is flexibility, right? If you wanna make a part and then change something in your design and then print the next one a different way, you don’t have to change any tooling. You don’t have to do anything. You just change your drawing, shove it into the CAD program, you’re ready to go. The other thing is complexity. You see all these little complex matrix designs with all these internal features. That’s what additive, especially fat scale is really good for.
Donovan: As opposed to forging, right?
Derek: As opposed to forging. So you can think of forging, you make a block and then you have to machine your shape in. So if you have something on the inside that you wanna make something shaped on the inside, you would have to get a rolled sheet or a forging, cut it into pieces, machine the inside and then weld it back together. In this process, you make it all in one go.
Donovan: Nice.
Derek: All the internal features are already in there, all the complex features are already in there, you don’t have to weld assemblies. So one of the big examples of that and consolidating parts has been SpaceX’s recent advancements in their rocket nozzles.
Donovan: Oh yeah.
Derek: Originally was this big bulky thing and all these pieces when they were figuring out how to do it. And the more and more you work out of prototyping, you can consolidate parts because you know what needs to go where and you can print that all as one structure.
Donovan: I literally just saw the other day, there was a picture of the phase one rocket and they have the phase three gen three rocket and it is incredible. It’s like you’re looking at something that someone put together in their living room versus something that looks like it’s coming off a polished machine floor.
Derek: Exactly.
Donovan: So if anybody out there is listening or doesn’t know, like Google those two images and you will be amazed. And you’re saying that’s what additive manufacturing is helping accomplish in more and more and more different fields.
Derek: Yep, yep exactly. Yep, so additive is one of those things where like when it first started out, people are like, oh, it’ll never be more than trinkets. And it’s growing to the point where it has its applications. I do think that, you know, five years ago or something it kind of saw this peak where it was a little over hyped. Just as every new technology usually gets, we’re gonna use it for everything, 3-D print everything. We don’t need tooling. And then, you know, you kind of get this decline where people are really like, oh, it’s not good for everything. It’s not the most efficient process, but it is the most efficient process for certain things. And it is the best process for certain things. And I really think that where you’ll see additive coming a lot is for things like prepared on parts. So you can think of like, okay, we have a big cylinder like this thing behind us and something comes along and puts a big crack in it or something. Instead of scrapping that whole piece or forging a whole new bar, you could come in with additive and just fill that in and then re-machine that spot. This is also something that may sound familiar because welders have been doing this for years and years and years and years.
Donovan: Yeah.
Derek: Weld buildup, weld overlay, multi-pass welding. A lot of times it’s the same thing as additive manufacturing in the metal field.
Donovan: That makes sense.
Derek: And so a lot of what’s going on right now, as well as people figuring out where that niche is, is figuring out how to qualify pieces, especially with places like DOD and DOE who have a little higher standards and figuring out, okay, well, like what’s different compared to what we’ve been doing with traditional welding, which processes are the same exact thing and what can we kind of carry over from what we’ve learned from our decades of welding.
Donovan: Well, that’s awesome, man. So your role at Elwood though, is you’re helping take this stuff that was done on a small level and make it into a big level or are you working on other stuff there?
Derek: Well, I’m mostly working on other stuff, a little bit additive, mostly on like business development side. It’s not something that Elwood’s super familiar with yet. So part of bringing me on was, I handle a lot of large forgings for DOD applications, a lot of Navy nuclear propulsion applications. That’s kind of my main field, but they’ve also brought me on to kind of look at additive, look at opportunities to put additive different places, obviously working within a team of people who have also been looking at it in the company, but having that additive background, they tend to loop me in there, try to get my opinion. But yeah, it’s been interesting coming from additive and learning about all the traditional manufacturing and foraging and everything. It’s not something you get on a lab scale, moving up to like a 2000 or 5,000 ton press, you’re like, man, these are big.
Donovan: Yeah, I can imagine that that’s not really for a college campus, you can’t really have a giant forge there. So let’s talk a little bit about the Elwood Group and what you guys do. So if someone out there is listening and they’re saying, “Well, what would be some things you guys can help them out with?”
Derek: Oh, Elwood in general is an old company, we’re over a hundred years old. We’ve been doing high level custom forgings for that entire time. We started out in Elwood, Pennsylvania, which is a smaller town, we’re one of the biggest companies there. They then expanded to another forge house just north of there in New Castle, Pennsylvania, and have then expanded, I think it was in the 80s, they were having an issue getting high quality forging ingots. So they said, “We’re gonna make our own.” And now we have one of the, in my opinion, one of the best melt shops for high quality forging ingots. So we have electric arc furnaces, degassing furnaces, and then we have all of our remelt facilities. We’re actually getting a vacuum induction melting setup also. So our melt shop is one of the higher tech business units. They do great stuff. And if you need forging material, definitely reach out to Elwood Quality Steels, they’ll hook you up. On the forging side, we then have many forging options. We have open die presses at our facility at Elwood National Forge in Corry, Pennsylvania. We have at New Castle, just across the wall from the melt shop is a forging shop. They have bigger presses, 3500 ton and 5000 ton. They also are partners with Scot Forge at North American Forge Masters, where we have the largest open die forging press in North America.
Donovan: Wow.
Derek: And that’s where we make things like chipshafts.
Donovan: So you guys aren’t just, you make parts for other forges, plus you’re doing a lot of forging on your own too, correct?
Derek: Yeah, we primarily make, we’ll make forging stock for other forgers to use. But then we’re also doing the forges ourselves. We’ll take things, split it from the melt to the rough machine state. So almost all of our Navy new components are rough machine components to a shape that started in a melt shop two hours away.
Donovan: That’s awesome.
Derek: Yeah, so it’s really great to see things go from some scrap chips to something that’s going in a submarine. And we don’t just do things at that high level though too. We do a lot of oil and gas, we do a lot of aerospace. Down in Texas, we have closed die forging and cladding opportunities also. So we really run the gambit in terms of forging and melting.
Donovan: Well, it sounds like if it has forges in the name, you guys are in it.
Derek: That’s pretty much it. If you think you can forge it, we can probably forge it. Or we know somebody else who can help.
Donovan: You know a guy.
Derek: Yeah, yep. My boss always says, there’s an Elwood for that.
Donovan: Yeah.
(laughing)
Derek: So, yeah, it’s been a great company to start my career in for sure.
Donovan: Yeah.
Derek: Get my feet under me and learn a lot and meet a lot of people and figure out how the industry works.
Donovan: I’m just so glad that we ran into you here. A couple people from Western Pennsylvania trying to help build things for Americans in America. And just so glad, it sounds like the work you’re doing and the knowledge you have. I’m like smarter for sitting beside you, I think. So I just really appreciate you giving us a couple minutes to talk about everything you got going on. And looking forward to maybe seeing you again next year?
Derek: Yeah, hopefully.
Donovan: Okay, yeah, bring some of your friends.
Derek: I’ll try.
Donovan: All right.
Derek: Yeah, yeah, yeah.
Donovan: Yeah, so that’s great.
Derek: Absolutely.
Donovan: Well, thanks for coming.
Derek: Thanks for having me.
Donovan: Check out Elwood Forge. You can just Google them up. You’ll find all the information there if you guys need anything about that.
Derek: We all have websites. Main company, all the business units, you’ll find them.
Donovan: Yeah. So probably, is your paper anywhere? If anybody’s really interested in reading something like that?
Derek: It should be published whenever the reviewers get around to reading it.
Donovan: Okay.
Derek: That’s always the challenge.
(laughing)
Donovan: For all my published papers, I know. No, I don’t even have anything published at all. But thanks so much for sharing what you have. Like I said, it’s a great amount of knowledge, and everyone who gets a chance to talk here, or listen to this will probably just really appreciate it. So check us out on YouTube, social media, Facebook, all those things, guys. And until next time, stay healthy and stay safe.
Derek: Thank you.
Narrator: Thanks for listening to the Dusty Jobs podcast. Breathe better, work safer.
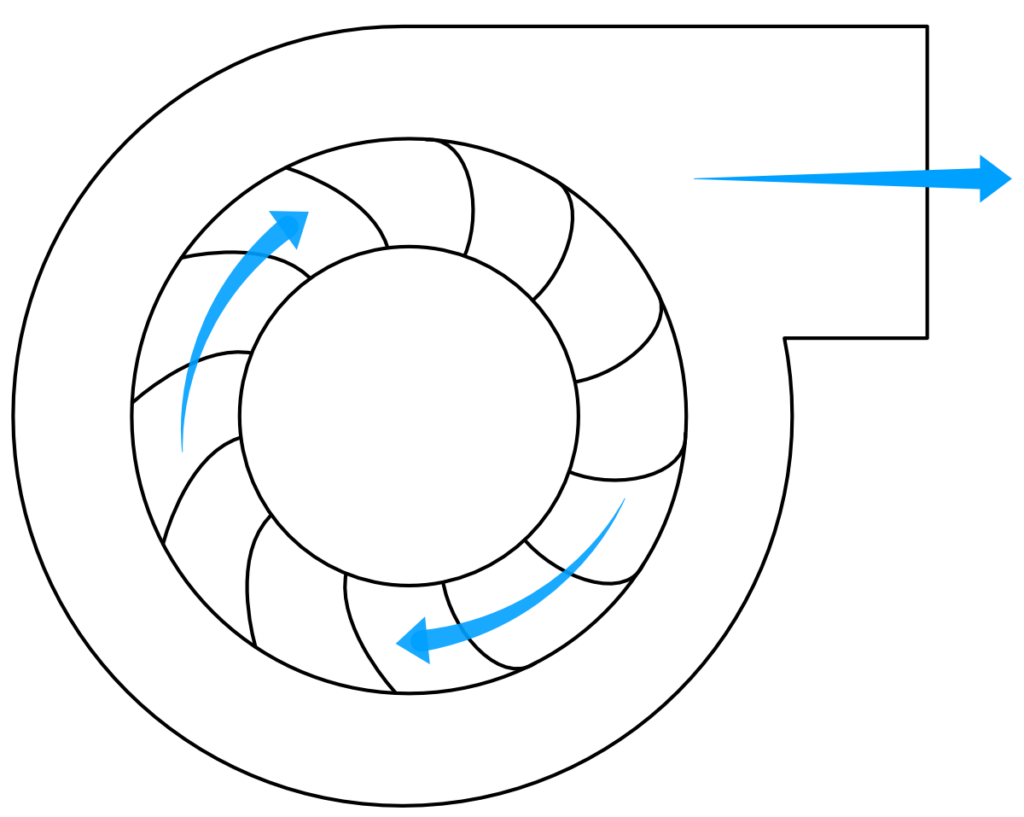
When selecting a fan wheel for a dust collection system, it’s crucial to understand the differences between radial blade fan wheels and backward inclined fan wheels. These two types of industrial fans serve distinct purposes and best suit specific applications. Below, we’ll explore their differences and when to choose one over the other.
Understanding the Fan Wheels
Backward Inclined Fan Wheel
Backward Inclined Fan Wheel
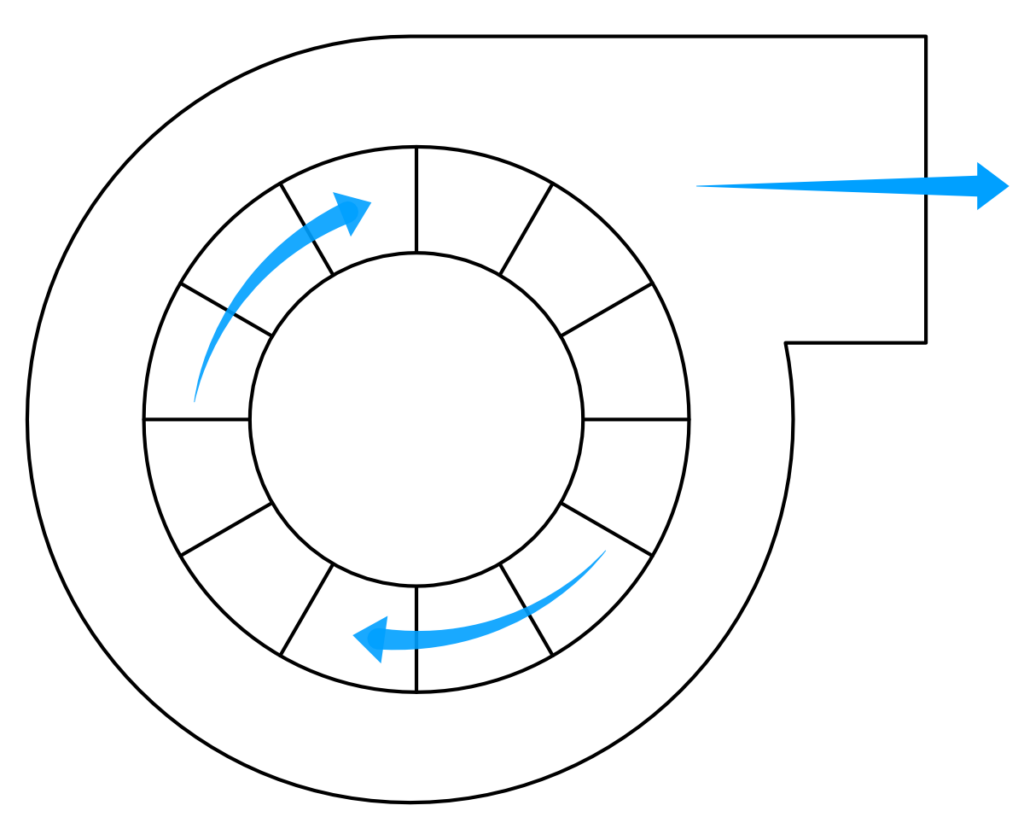
A backward inclined fan wheel is a type of centrifugal fan in which the blades curve away from the direction of rotation. This design allows for efficient air movement. Its common use is for general ventilation, forced cooling at higher pressures, and also in dust collection systems where the fan operates on the clean air side of the dust collector. The curved blades enhance efficiency by reducing energy consumption and noise while maintaining strong airflow.
Radial Blade Fan Wheel
A radial blade fan wheel features flat blades instead of curved blades. These fans operate at high pressure and move air radially outward from the center of rotation. Due to their design, radial blade fans handle particulate-laden airstreams more effectively than backward inclined fans. This makes them ideal for dust collection applications where some dust bypasses the separation process.
Choosing the Right Fan for a Dust Collector
The choice between a radial blade fan wheel and a backward inclined fan wheel largely depends on the placement of the fan in the dust collection system:
Backward Inclined Fan Wheel: Best suited for applications where the fan is positioned after a dust collector that uses filters to remove dust from the air. Since these fans are designed for clean air environments, they work efficiently with minimal maintenance concerns.
Radial Blade Fan Wheel: Ideal for situations where the fan follows a cyclone separator, which may allow some dust to pass through. Radial blade fans are designed to handle dust-laden air efficiently without clogging or experiencing excessive wear.
Best Applications for Each Fan Type
Backward Inclined Fan Wheel Applications:
General ventilation systems
HVAC systems requiring higher pressure
Dust collection systems where the fan is on the clean air side (after filter-based dust collectors)
Industrial processes that require efficient airflow with minimal energy consumption
Radial Blade Fan Wheel
Radial Blade Fan Wheel Applications:
Dust collection systems including a cyclone where dust-laden air must still be handled by the fan
High-pressure industrial applications where particulates are present
Material handling systems where the air carries solid particles
Processes involving sticky or fibrous materials that might clog other fan types
Choosing the right fan wheel for a dust collection system is essential for maintaining efficiency and longevity. If the fan operates in a clean air environment, a backward inclined fan wheel is the best choice due to its efficiency and quieter operation. However, if the fan must handle dust-laden air, a radial blade fan wheel is the preferred option because of its ability to resist clogging and handle particulate matter effectively. By understanding these distinctions, you can select the optimal fan wheel for your specific dust collection needs, ensuring reliable performance and system longevity.
We’ve been eager to connect with our lead installer, Ryan Jackman, for some time. We finally had the chance to sit down and discuss the crucial considerations for a successful dust collection installation. Many customers are unsure about the specifics, such as the required size of the concrete pad or whether the installation area is sufficiently clear of obstructions for crane access. Donovan poses these questions to Ryan to provide valuable insights to our customers for their first dust collector or baghouse installation.
Narrator: Welcome to the Dusty Jobs podcast from Imperial Systems. Industry knowledge to make your job easier and safer.
Donovan: Hello and welcome to another episode of the Dusty Jobs podcast. We’re glad to be back in the studio. It’s been a little while since we’ve been in here, but today we got Ryan Jackman with us. Ryan, how you doing, man?
Ryan: Pretty good. How about yourself?
Donovan: Good, good. So Ryan, what is your role here at Imperial Systems?
Ryan:So here at Imperial, I am the installation manager. I manage all the installs that the customer requests from our factory, so factory installs on all equipment.
Donovan: Yeah, yeah, and you’ve been doing that for us four or five years now?
Ryan: About three and a half years, yeah.
Donovan: Three and a half years, yeah. So plenty of experience, have seen tons of problems, issues, good installs, bad installs, and so today we’re gonna talk to you about what we can do to help have installs ready. But before that, I wanna say, now prior to working with Imperial, you did serve in the military, correct?
Ryan:Yes.
Donovan: So you did a little bit of time with–
Ryan: I was in 10 years in the US Navy.
Donovan: Right, so I just wanna say thanks for your service and we really appreciate that. So we’re great to have our veterans. We have a couple veterans that work here with us at Imperial and we’re just glad you’re one of those. All right, but let’s get into this. All right, when we’re talking about installation, right? What is the, what’s the top thing people could have ready for you guys when you show up or ready for themselves if they’re gonna do a self-install? What are the top things you say, have this ready ahead of time and things will go way smoother?
Ryan: So there’s quite a few things. Just off the top of my head, first thing would be site preparation. I mean, where the equipment’s going to be placed, a nice level concrete pad or at least plans to make the equipment level itself in a thorough plan of where you want the equipment to be ran, routed, duct work runs, that kind of stuff. But the biggest thing is site prep. Just having that space to work and to install the equipment.
Donovan: So not just the pad ready, but the space around it you’re saying?
Ryan: Yeah, so like just having room to assemble the equipment ’cause assembling this equipment takes up a lot of space and the more space you have, the easier the install goes.
Donovan: So a typical CMAXX, let’s say we’re on a CMAXX that’s a CM10. That’s like what the dimensions on that’s probably about 20 feet long, 10 feet wide, right? So when you have a piece of equipment that’s around that size, how much area around that area do you need to do work? Twice the size of the CMAXX, three times? What do you look, I mean, obviously, as much as you can get, right?
Ryan: Yeah, I mean, if you could comfortably operate like heavy machinery, like a telehandler forklift, or you can move materials in and out around the equipment along with the equipment being there, it would be plenty enough room.
Donovan: I gotcha, I gotcha. So that’s if we’re doing a ground install. What if we have to put this on top of a building? What are you looking at for that?
Ryan: First off, making sure the building can support the weight of the unit.
Donovan: That’s a really good idea to check with some engineers before we get there. –
Ryan: And then if you’re making roof penetrations or stuff like that, just making sure you have the subcontractors, whoever you’re using, lined up. So once you cut that hole in the roof or you make that penetration, you can go back and close it up.
Donovan: That’s a great point. A lot of times, we don’t do everything that’s needed to be done on the job. There’s points where you need other people to be partner with us in this endeavor, right? And one of them is you set a roof contractor. We’re going through the roof.
Ryan: Electricians or guys that run air lines or really any subcontractor, concrete guys, all that stuff needs to be lined up before you start your install.
Donovan: So the more communication prior to that with other subcontractors, do you see that it tends to help it get a lot smoother, you think?
Ryan: Yeah, so if everything’s planned out in a sequential fashion, everything runs seamlessly. And I can hand off to a sub and he can hand back off to me and we can just keep moving along.
Donovan: Right, we don’t want to be putting the CMAXX up and then trying to pour the concrete, right?
Ryan: Yes, absolutely.
Donovan: So I know one of the questions I get a lot when people are getting ready to do an install is they ask about that concrete pad and they ask how big it should be and they ask how thick it should be. Now, I know for one, we can’t always tell them how thick it should be because how thick you need a pad in Canada could be totally different than how thick you need a pad in Florida. So, but when we’re talking about the size of the pad, okay, and if we give them a footprint of a CMAXX, how much bigger would you want that pad? I mean, obviously as big as you can, but minimum.
Ryan: Yeah, I mean, obviously larger is better. But at a minimum, I would say you’d want at least a foot in every direction larger than the footprint of the equipment.
Donovan: Yeah, and that helps give you guys enough room to…
Ryan: Yeah, that gives enough room so you’re not putting anchor bolts right on the edge of the pad or you’re not side loading the pad and that kind of stuff. And then if you do need a little bit of wiggle room to move the equipment to the left or to the right, a couple inches to miss a structural beam inside, you know, you have that option.
Donovan: That’s a good point. Sometimes you’re looking on the outside, people don’t always think about what’s going on on the inside. So, kind of try to see that project with some X-ray vision if you can when you’re thinking through it. That’s a good thing. Okay, so what are the top things when you get to a job site that people tend to forget? Are there certain things you run into time and time again that you’re like, oh, people forgot about this? What would that be?
Ryan: I would say just, if myself is doing the install as a subcontractor coming onto a customer site, forgetting to relay information when we’re able to work, what kind of safety equipment we have to have while we’re there or is there special regulations we have to follow? Do we have to have extra PPE or something along that lines? Relaying that information ahead of time allows us to plan more on when we can work, how long we can work, who has to be on site while we’re working, just that kind of stuff. I mean, for a customer that’s doing self-install, I mean, if you’re doing a self-install at your own facility, everything’s kind of on you.
Donovan: Right, right. But for you guys, if they’re coming, maybe if you have to have a safety training video ahead of time, that’s good to let you know.
Ryan: Yeah, all that. Anything that takes up time is good information to pass.
Donovan: Right, yeah. Yeah, some places have lockout tagout systems that are different than other ones. Some places have different hot permits or different permits that they need. So all that information being passed to you ahead of time is really gonna help make things go smoother.
Ryan: Yep.
Donovan: Right, well, that’s great. If you had to give someone the top tip other than give you a call and talk ahead of time, right? Which is obviously more communication better, right? What’s the top tip for when you’re putting in a CMAXX? Something that’s just like, maybe something you’ve learned along the way that’s like, oh, if you do this, it makes things go easier.
Ryan: Top tip to customers when you receive initial approval drawings of your system is to review those in detail. Make sure that the equipment that you have allocated to be connected to is where it’s going to be. Make sure that the duct runs are where you want them, satisfactory to your liking. ‘Cause the one big thing we like to avoid is rework. So putting something up and then realizing, oh, that’s not quite how we wanted it. Let’s do it this way.
Donovan: Right, and I’m glad you brought this up because we’re sitting here talking about installing a CMAXX, but here at Imperial, we’ll do the full turnkey system. We can help with the engineering. We can help with all the duct runs. And I know for you, a lot of times, if you can do it, it’s great to, I would say if someone’s out there getting ready to do an install, ask for your salesperson to put a little money in the budget to have you guys come out ahead of time. Wouldn’t you say that’s a big money saver in the end for a lot of people?
Ryan: Oh, absolutely. Yeah, this is what we do every day. So I can walk on site and check out a site and I can tell you 10 things you can do and 10 things you can’t do that you probably wouldn’t have thought about in the first place. Just how our equipment goes together and how it works and what it takes to erect it. So yeah, just reviewing those, taking that time to plan the system out and the engineering and then reviewing those documents before it actually gets fabricated and installed.
Donovan: Right.
Ryan: It saves so much time.
Donovan: And like I’m saying, I think it’s huge. If you can afford it and you can have it to get you and the other guys who are helping engineer this there ahead of time, boy, that’s gonna save a lot of headache in the end from what I’ve seen on a lot of jobs. Because like you’re saying, you’re not going and putting a heater in on the weekends. We’re not playing tulips on the side. We just do this. This is all we do is installation of industrial ventilation systems. That’s it. Everything from our BRF to a CMAXX and those can be very different beasts when we go to put them in. But you’ve done them all.
Ryan: Yeah, yep.
Donovan: So what’s the craziest thing you’ve seen on a site when you’ve got there and you’re like, man, I wish I could have got eyes on this ahead of time.
Ryan: Oh, there’s been quite a few.
Donovan: Go ahead, give us a couple.
Ryan: Showing up to a site and like the customer never relayed that there was overhead power lines directly above where we needed to set equipment. So we had to completely change up how we were gonna erect this ’cause we couldn’t use a crane or anything like that. You know, that plays into a safety factor too. Like the more information you can give about your site. I mean, we can look on Google maps all day, but you can’t see everything.
Donovan: Right.
Ryan: Terrain that your site’s on, just all that stuff helps. You know, other things is we were at a customer’s facility one time and we had to hang large diameter ductwork from the ceiling and come to find out their ceiling would not support that ductwork. So we had to change the whole system and move everything outside and ground some support everything. So just doing your due diligence ahead of time, you know, really plays into it. And that keeps me from having stories to tell when I get back.
Donovan: Well, yeah, I mean, but here’s what I love about your story, Ryan. Typically when we have these stories, it’s not like, and we had to walk away from that. You guys have always found a way to work with the customer and make it right.
Ryan: Yeah, that’s the thing when you’re doing field work, it’s not “can’t”. Can’t’s not an option. It’s how.
Donovan: Right.
Ryan: I got told by a good mentor of mine one time that can’t isn’t an option. You have to figure out how you’re going to do it. So it’s just get it done.
Donovan: Right, right. And I know we’ve said about a hundred times on this already, but the more communication up front, the more information we have at the beginning, the more, the best information we get helps that not turn into having to pivot on these job sites, but it helps it be, have a real clean plan when we come in. And that’s really what we want, right?
Ryan: Yep.
Donovan: So what is the most successful install you’ve had? One where everything just went perfect.
Ryan: I mean, no install is perfect, none of them. There’s always something to fix. There’s always, you know, when you’re dealing with such large systems, there’s going to be something that’s missed, but I mean, one doesn’t stick out on the top of my mind. I mean, every install we do equipment wise goes good. But I would say…
Donovan: There’s not one where you came home and you just said to the wife, you know what, that one went how, I wish they all went like that.
Ryan: Yeah. We did an install in Sullivan, Illinois at AgriFab actually. It was a larger CMAXX, I think it was a CM32 and we were connecting to two laser tables. It’s a frequent customer of ours. We go there quite often. We have quite a few systems there and they know how to work with us. They, you know, we relay information back and forth and that was the one install I think went flawless from start to finish. You know, our collector placement was good and wall entries were fine. You know, it was to equipment we were familiar with and Mazak lasers. So we had the, you know, the diameters of the connections themselves and everything just went smooth. We were scheduled to be there a week, I think. I think we finished it in two and a half days. So that one really sticks out in my mind. There’s been a couple other ones with larger equipment like bag houses, but those were pretty much just equipment only, new duct work. It really starts to get into it when you’re starting to get into buildings and connecting to equipment. That’s where all the little nuances come into play and where people miss things and elevations and.
Donovan: Yeah. But I like the things that you said about your most successful one that you could think of in your mind. It hit all the points that we’re trying to get on, right? That they had their site prepped on ahead of time, right? They were familiar with us, were familiar with them. They understood, we understood what equipment we were hooking up to. They understood what the requirements were of our equipment. And so the number one thing I know for a lot of people out there listening is probably this might be one of the only times they get installed. They might only buy one or two dust collectors, but the more you can learn about Imperial ahead of time, the more we can learn about you, really seems like that’s gonna be the key to having a great install.
Ryan: Yeah. And I’ll say this, we have those one-off customers that we only go to their place one time, but I would say 95% of the time when we’re somewhere, we’re coming back. They’re getting more equipment. We’re gonna be doing more. I get asked all the time to, “Hey, while you’re here, can you come look at this real quick? We wanted to do this.” Our company and our guys are really good about getting the work done and getting it done responsibly and quickly. So, repeat customers is a constant thing for us.
Donovan: Well, that’s great to know too, because if you’re out there and you’re getting a CMAXX and you think you have something else we could help you out with, like Ryan’s saying, he’s more than glad to come and look at whatever you got going on there. Relay that back to the home base here so we can keep serving people well. So, all right, here we go, last thing. Number one hot tip for, if you do this one thing, well, we already said that, didn’t we? It’s have Ryan come ahead of time if you can. That’s the best tip. If we can have someone there on site, have them there.
Ryan: Yeah, and then for self installers, I would say number one is if you have questions, call, ask.
Donovan: True.
Ryan: Don’t assume that you’re doing it correctly. If you don’t think you’re doing it right, call, talk to one of our service techs or our sales guys or anything like that and just call and ask the question. That way you get it right the first time and then when we come out to do the startup, it’s seamless.
Donovan: Yep, yep, so for mechanical contractors or anybody else out there that might be listening to this to do self install, yeah. If it doesn’t go right the first time, have Ryan do it the second time. So, right?
Ryan: Yep.
Donovan: There we go.
Ryan: Always goes easier the second time. So, all right, well hey, thanks for giving us a couple minutes. I know you guys are busy and we can never really even catch you in the office here, but really appreciate it. For everyone else that’s out there listening, like, subscribe, come to all our social media feeds, LinkedIn, YouTube, Facebook, and until next time, stay healthy and stay safe.
Narrator: Thanks for listening to the Dusty Jobs podcast. Breathe better, work safer.
Industrial dust collectors play a critical role in maintaining a safe and clean working environment. Still, their effectiveness can come at a cost that should be considered at the time of purchase. While the initial purchase price often takes center stage, the true financial impact of a dust collection system lies in its operational costs. By understanding these hidden expenses, facility managers can better plan budgets and optimize system performance.
Energy Consumption
One of the primary factors in the operational cost of a dust collector is energy consumption. Dust collectors require powerful fans and motors to capture airborne particles, and these components run continuously during operation. Depending on the facility’s size and the system’s workload, energy costs can quickly add up. It’s important to look for systems that offer energy-efficient designs. Examples include variable frequency drives (VFDs) or optimized airflow management, which reduce electricity usage while maintaining effective dust control.
Maintenance and Labor
Regular maintenance is crucial for ensuring that a dust collector continues to perform at its best. Maintenance tasks can include cleaning filters, inspecting and replacing worn-out parts, and conducting system performance checks. These activities not only incur material costs but also require labor hours. Skilled technicians are needed to perform these tasks safely and effectively, which means labor costs must factored into the overall budget. Neglecting regular maintenance can lead to system inefficiencies or unexpected breakdowns, resulting in more expensive repairs and even unplanned downtime.
Consumable Replacements
Over time, certain components of a dust collection system, such as cartridge filters or filter bags, will wear out and need replacement. The frequency and cost of these consumables depend on the type of dust collector and the nature of the collected dust. For example, environments with high dust loads or abrasive materials might require more frequent replacements. Additionally, some brands of dust collectors may require more or less filters than others. It’s essential to factor in these recurring costs when evaluating the long-term investment in a dust collection system. Budgeting for consumable replacements ensures that your system continues to operate safely and efficiently without interruption.
Downtime and Productivity Loss
Operational downtime is another significant cost that often goes overlooked. When a dust collection system is offline due to maintenance, repairs, or unexpected failures, it can disrupt production processes and lead to lost productivity. In industries where continuous operation is critical, even a brief downtime can translate into substantial financial losses. Investing in a reliable system and filters, and implementing a preventive maintenance program can help minimize downtime. Additionally, having a contingency plan in the form of spare parts can mitigate the impact on production when issues arise.
Disposal Costs
The process of collecting dust is only one part of the equation. Disposing of the captured dust and spent consumables safely is another challenge that incurs costs. Depending on the material collected and environmental regulations, the disposal process can involve significant expenses. Whether you need to transport the waste to a specialized facility or follow specific hazardous waste handling procedures, these costs need to be considered in the overall operation of the dust collector.
Regulatory Compliance
Lastly, ensuring that your dust collection system meets local and federal safety and environmental regulations is essential—and often expensive. Regulatory compliance might involve investing in additional equipment, regular inspections, or modifications to the existing system. Failure to comply with these standards can lead to fines, legal issues, and even forced shutdowns, all of which can have a significant financial impact. Staying updated with regulatory requirements and incorporating necessary changes proactively can help avoid costly penalties and safeguard your business operations.
Consider the Dust Collection System’s Operational Costs First
In summary, while the initial investment in an industrial dust collector is an important consideration, the ongoing operational costs—ranging from energy consumption and maintenance to consumable replacements, downtime, disposal, and regulatory compliance—play a critical role in the system’s total cost of ownership. By taking a comprehensive approach to budgeting and maintenance, facility managers can ensure their dust collection systems are not only effective at protecting workers and equipment but also cost-efficient in the long run. Balancing these costs against the benefits of a cleaner, safer workplace is key to making informed decisions and sustaining operations over time.